Description
Tork Tool Cummins 24V Injector Puller
1998.5 to 2002
The Best 24V Injector Puller for LESS than 40 Bucks.
 The CIP040 Cummins injector puller, by Tork Tool, is the newest tool for the Cummins 5.9. It was designed specifically for the 1998.5 to 2002 Cummins 24 valve. Now, you don't have to remove the rockers when you change to performance injectors.
We looked at the current Cummins injector pullers that are on the market. The one thing that we didn't like was the use of a very long bolt. This prevented us from using a ratchet and deep socket to remove the injector. We chose to use a hardened set screw of the exact length. The beauty of this tool is it fits under the cowl for #5 and #6 injectors.
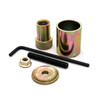
This heavy duty tool was designed to make injector changing a simple project. The CIP040 features a thick wall tube and a custom washer that is machined to center on the tube. This automatically centers the tool over the injector body.

We also took a look at the connector tube remover. The current remover has a screwdriver slot in the outer diameter. In our testing, we managed to get a few busted knuckles from the screwdriver slipping out of the groove. I think they designed it that way to save on material and machining costs. The CIP040 removal tool is machined from larger stock so you have a larger knurled head to assist in tube removal. We built it so you can bottom the tool in the head and the tube is easily removed. The remover acts like a jack screw. On really stuck tubes, the large head allows you to pry on back side of the head, and your screwdriver never slips off!
Included in the CIP040 Cummins Injector Puller kit is a HD tube, custom washer, hardened set screw and hardened flange nut, 4MM Allen wrench, connector tube remover and detailed instructions. All this for less than 40 dollars. ORDER TODAY.
1 Review
1 Review Hide Reviews Show Reviews
-
5 Star Rating
CIP040 Posted by Rob on 16th May 2011 Awesome tool! Changed my injectors in 15 minutes. It doesn't get much better than this. Thank you for the CIP040 TT. Real Quality Tool Posted by Matthew Adams on 22nd Apr 2011 I have been a heavy diesel mechanic for 20 years. Thank you very nice tool!